Category Archives: Uncategorized

Portobello Mushroom And Shrimp Fettuccine Alfredo

Standard
Portobello Mushroom And Shrimp Fettuccine Alfredo

I love a yummy comfort food pasta, and this definitely fits the bill. It warmed me up on this cold day, and was even better later re-heated. Just remember it’s only as good as the ingredients you put in it, so choose a good cheese and a good heavy cream for your sauce, and always keep good butter on hand. You can choose pretty much any vegetable to put in here instead of mushrooms (or omit them entirely), but I think the mushrooms paired nicely with the shrimp. Also, I think garlic would’ve gone nicely with the dish and will definitely try it in there next time I make this.

Ingredients:

  • 1 1/2 sticks of butter
  • 1 pint heavy cream
  • 1 lb fettuccine pasta
  • 1 carton of mushrooms
  • 1 1/2 lbs shrimp (peeled and deveined)
  • 2 cups of shredded Parmigiano-Reggiano cheese or Parmigiano-Asiago blend
  • Salt and Pepper

1. Bring a large pot of salted water to a boil and cook your pasta as directed on pasta box or how you like it. Personally, I think al dente is gross and like fully cooked pasta 🙂 You can begin work on the next steps while your pasta is cooking. Note that when the pasta is done, it’s best to drain it and put it straight back into the pot you cooked it in and toss with some olive oil to keep it from sticking together.

unspecified-4

2. Slice your portobello mushrooms and then sauté with 2 tablespoons of butter and season liberally with salt and pepper. Allow to cook for a few minutes on medium-high heat, then take out of skillet and place into bowl for later.

unspecifiedunspecified-1unspecified-2

3. Make sure your shrimp is as dry as possible by patting it dry with a paper towel before adding it to your skillet.* Add another 2 tablespoons of butter to your skillet and add your shrimp and season liberally with salt and pepper. Cook on medium-high heat for a few minutes and stir around to make sure both sides are cooked evenly. You’ll know they’re done when they turn orange and form little c’s.

*I find that whenever I use previously frozen shrimp that no matter how well I pat them dry, I still end up having to drain off excess liquid during the cooking process. It’s ok if you have to do that, just remember to re-season them later if necessary.
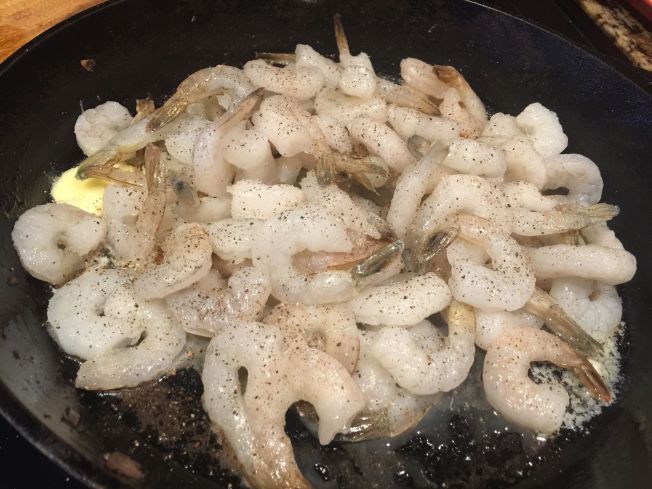
unspecified-3unspecified-5

4. Place your shrimp into the bowl with your mushrooms and place your whole stick of butter into the skillet now with heat reduced to medium. The butter will start to melt quickly, and once it does, you will add your pint of heavy cream to the skillet. Allow it to simmer on this elevated heat for about two minutes, then turn the heat down on low. Also, I hope you have as cute as a kitchen helper as I do during this step. 🙂

unspecified-7unspecified-9unspecified-8unspecified-10

5. With the heat on low on your heavy cream and butter, now you’ll add your 2 cups of cheese. Allow it to melt into the sauce for a few minutes, then season it liberally with salt and pepper. This step is important, or else your pasta sauce will be bland.

unspecified-11

6. Now add your bowl of mushrooms and shrimp back into your sauce, and add your fettuccini to combine it all into one big pot.

unspecified-13unspecified-15unspecified-16

7. Enjoy 🙂

unspecified-17

Apple Butter

Standard

  
One of my favorite things in life is apple butter on top of a buttery piece of toast in the morning. Yum!!! I also love the excitement of when the grocery store here gets their big shipment of apples in, and I always get a bunch of my favorite Honey Crisp apples. Those, as well as a few other kinds make up this recipe of apple butter, but feel free to stick with just your favorite or go all out like I did.*

The rich gold color comes from the length of time you let this slow cook. I did mine for 8 hours, but I easily could’ve let this go all night in a crock pot if I had one big enough. 

You can either make this recipe and freeze it or can it. I canned mine and I’m not going to get too descriptive in the canning instructions because I’m going to assume you know what you’re doing. If not, see my Strawberry Apricot Jam recipe for further detail or of course just ask me in the comment section.

*I used a mix of mostly Honey Crisp, Golden Delicious, Sweet & Crunchy, and a girl in my MOPS group gave me some from her tree at home that looked like McIntosh to me, but she wasn’t sure what kind they are. 

Ingredients: 

1. First lets prep those apples! But first, let’s spike some cider to get us in the mood 😉 Ok, now then…


2. Toss all your apples into your giant pot.

  
3. Now dump in your spices, sugar, and cider and bring to a boil. *If you’re doing this in a crock pot you can just turn on low and come stir it in a few hours. Let it boil for a minute or so, then turn down to a simmer. Cover mostly with a lid but allow a small space to remain to let some of the steam out.


4. Now you’re going to let this slow cook for a minimum of six hours (I did mine eight but could’ve gone longer like I said before) but keep coming back to give it a stir every now and then.


5. Once it’s the color you want, get out your hand blender and go to town on these puppies!


6. Now you can either divide this out and freeze it, or can it like I did with a ten minute water bath. Again, check my recipe above for water bath times where you are if you aren’t sure. This made 14 1/2 pint jars. 

  
7. Now go get a big honkin’ slab of butter and put it on some bread, toast it up, and then lather it up with some golden apple butter. Delicious!


Coconut Oil

Standard
Coconut Oil

Coconuts

Ok y’all, this is probably the only “lifestyle” post you will ever see on my blog, because outside of cooking, I’m pretty much as lost as the rest of you when it comes to doing makeup, weight control, choosing what to wear for the day, finding matching socks, and generally making any decisions. But I have been so impressed with this recent change I’ve made in my hair, skin, and nails habits that I had to share it with everyone!

Unless you’ve been living under a rock, I’m sure you’ve read somewhere that coconut oil has many different benefits for anyone and everyone. Well, after reading what felt like the millionth article on the subject, I decided to give coconut oil a try. First, I started out doing weekly hair masks with it, and WOW! First of all, I had just had my second child and was going through the dreaded hair falling out stage when he hit about 4 months old. Ahhh!!! Also, my once lovely hair was dry as a bone even though I hadn’t colored it or anything. I tried several over the counter hair masks and even broke out my blender and did a homemade hair mask with eggs, olive oil, mayo, and avocado. Not only did my hair smell like a necromancer blended up the body of a rotting carcass and put it in my hair, but it really didn’t make that big of a difference for me! But back to the coconut oil…. I started doing masks once a week and leaving it on my hair anywhere from 20 minutes to an hour before taking a shower and it made a MAJOR difference in my hair! Also, it smelled delicious and sort of like Caramel deLite Girl Scout cookies too, which was a major improvement from the dead body stench I had been sporting before.

All you need to do is get some coconut oil. I use  Nature’s Way Extra Virgin Organic Coconut Oil, 16 oz. but if you spend about $3 more you’ll get double  Nature’s Way Extra Virgin Organic Coconut Oil, 32-Ounce

Coconut oil is solid until it hits about 76 degrees, so depending on where you live and what season you’re in the oil may be very easy to remove with your hands from the jar or you might need to get a spoon to scoop it out. Get a small handful and rub your hands together and it will turn into a liquid.

IMG_4225 IMG_4226

Next, start at your scalp and start massaging the oil into your scalp and work your way down to the bottom strands of your hair. Continue repeating this step until all of your hair has been covered with the oil.

IMG_4224

Then wrap your hair all up together if you don’t want your hair to drip all over you or wrap a towel around your head and let it sit for 20-60 minutes, or even overnight.

IMG_4227

Lastly, wash it out with shampoo and condition as normal. After your hair dries you will be amazed at how silky and soft it is, not to mention if you suffer from frizz you will see a big improvement in that area too!

IMG_4253

After I would put the coconut oil on my hair I noticed my fingernails were getting stronger and cuticles were making some improvements because of the brief amount of time I had my fingers working with the stuff. Now I try to remember to put a little bit on my fingers each night and I really like the results!

IMG_4229

Lastly, and I know you’re going to think I’m crazy, but my husband and I have started washing our faces with coconut oil! What?! That’s crazy talk, I know! But seriously, it WORKS! My husband’s exact words when I asked him to try this with me were “Guess I will have to take a personal day off of work to stay at home with my pizza face after putting oil on it!” But it did NOT give him pizza face, haha! In fact, it has helped both of our faces with blemishes and dryness (my skin) and oil (my husband’s skin). I had read on a website somewhere that “like dissolves like” when it comes to washing your face with oil, so I decided to give it a try. Not only is this insanely cheaper than buying the three step face washing programs I’ve been led to believe are the only solutions for my skin, but it is 100% all natural and not only cleans your face, but moisturizes it and helps prevent fine lines and wrinkles. There’s no need to remove your makeup beforehand, even waterproof, because it dissolves that easily as it cleans out your pores.

All you do is get a small amount in your hands, rub together so it turns liquid, and rub into your skin for at least one minute. Then rub off with a wash cloth and warm water. That’s it!

I read that some people do not need face lotion after washing their face like this, but I always put on a sunscreen for the day BOOTS No7 Lift & Luminate Day Cream SPF15 and at night I just put a tiny amount of coconut oil on my fingers and rub it straight in to areas I’m feeling a bit dry.

Well, I hope you’ll give coconut oil a try. I’m very happy to say my one jar of coconut oil is still in use almost going on three months now, and the amount of money I’ve saved on skin products and hair masks is amazing!

Image of coconuts courtesy of Pixomar at FreeDigitalPhotos.net