Monthly Archives: January 2014

Meatloaf Sandwiches

Standard
Meatloaf Sandwiches

Meatloaf Sandwiches

Are you ready to taste one of the most delicious sandwiches you’ve ever had in your life? Well I hope so, because this sandwich is amazing!!! This came from meatloaf leftovers, obviously, and is now a staple whenever I make meatloaf. So get out some box wine and get ready for this cheap and delicious sammich!

Ingredients:

Meatloaf slices
1 sweet onion sliced
Butter
Olive oil
Cayenne pepper
Salt and pepper
Scoop of leftover mashed potatoes (optional)
Mayonnaise
Provolone cheese
Bread

1. Sauté onion with butter, drizzle of olive oil, salt, pepper, and cayenne 15-18 minutes on medium to high heat.
image

2. Once your onions are done, turn to low to keep warm and place a few pats of butter in another skillet to grill your bread.
image

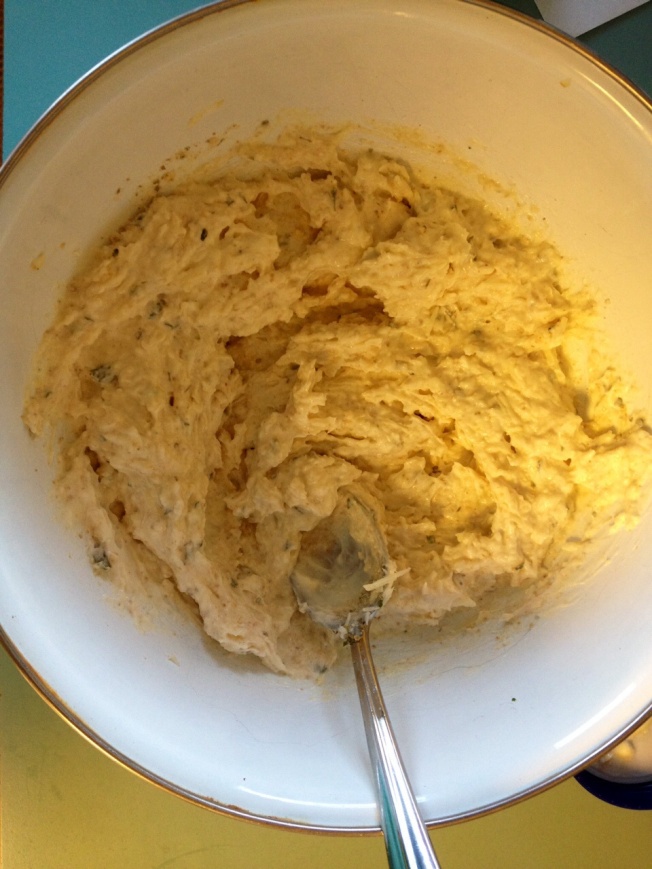
3. Smear mayo on one slice of bread and leftover mashed potatoes on the other piece and place into skillet.
image

4. Place your sliced meatloaf onto the bread and then top with your sautéed onions and provolone cheese.
imageimage
image

5. Place other piece of bread on top and flip over after a few minutes so it cooks evenly on both sides and cheese melts completely. This is seriously one of the best things you’ll ever put in your mouth!!!
image

Meatloaf

Standard
Meatloaf

Meatloaf

Ahhhh, meatloaf… Nothing says “Home” like meatloaf and mashed potatoes. This meatloaf is so yummy and definitely a crowd pleaser! The sautéed veggies and ketchup/BBQ sauce mix inside and out really make this meatloaf stand out from other recipes 🙂

Ingredients:
1 sweet onion chopped
6-8 mini bell peppers chopped or 1 large bell pepper
1 garlic clove chopped
Around 2 lbs ground meat (I used a little over 2) and you can use venison, beef, turkey, pork, or any combination of those together
1 T Worcestershire sauce
1 egg
1 cup Italian breadcrumbs
Ketchup
BBQ sauce (I use Sweet Baby Rays Original)
1/4 tsp garlic salt
1/4 tsp paprika
Salt and pepper
Olive oil
1 T Butter (optional)

1. Put your chopped veggies, olive oil, butter, salt & pepper in a pan and sauté about 10-12 minutes before adding in garlic. Then sauté another 5 minutes or so.
image

2. After your veggies are cooked, combine them in a large bowl with meat, 1 egg, Worcestershire sauce, 2 T ketchup, 1 T BBQ sauce, 1/4 tsp garlic salt, 1/4 tsp paprika, and give it a little regular salt and pepper too.
image

3. It’s at this point I like to add my breadcrumbs. I fill up a 1 cup measuring cup and sprinkle it in there until I get the consistency I’m looking for. I used just right under a full cup. You want it to be sticky and sort of wet, but moldable enough to hold its shape on the pan. Once you’re happy with your texture, place your mixture onto a cookie sheet that’s been covered in foil and sprayed with non-stick cooking spray. It should look like this:
image

4. Now you’re going to make a glaze for the meatloaf. I used about 1/3 cup of ketchup and probably 2 T BBQ sauce, but honestly I didn’t measure it. I usually just squirt it into a bowl until it looks right 🙂
image

5. Pour the glaze all over your meatloaf and make sure it covers all the meat.
image

6. Place in a preheated 375F oven for 50-60 minutes.
image

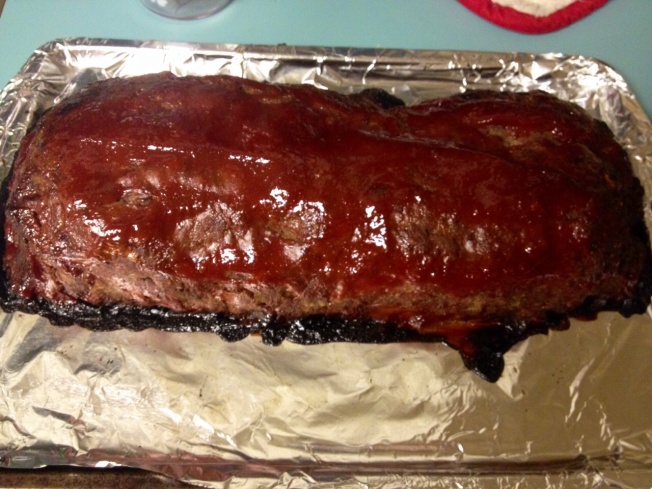
7. When it’s done it will look like this bad boy right here:
image

8. Serve with mashed potatoes and southern turnip greens for the perfect meal!
Meatloaf

Soup For A Cold Day

Standard
Soup For A Cold Day

Soup For A Cold Day

Y’all, I could hardly drag myself from my bed with my electric blanky into my bathroom with my personal space heater due to this crazy weather. It’s safe to say I despise the cold, and if I had it my way it would come for Christmas holidays then GO AWAY! This soup was so yummy and warmed me up long enough so I could build a fire and try to stay warm!

Ingredients:
3 boneless skinless chicken thighs
1 sweet onion chopped
1 cup frozen corn
1 cup frozen peas and carrots
1 garlic clove chopped
1 – 1 1/2 tsp your favorite season-all (I used Janie’s Crazy Mixed Up Salt)
GOYA Sazon, GOYA Adobo, and GOYA Seasoning Total Seasonings
1 box chicken broth
1/2 – 3/4 c queso (Didn’t see that comin did ya?!)
1/4 – 1/2 c half and half
1 can Rotel
1/2 c uncooked rice

1. Put your chicken thighs in your soup pot and season both sides liberally with the three GOYA seasonings. Look familiar? It should, this is the same stuff used on my grilled chicken recipe!
image

2. Once your chicken is done, pull out and set aside. Then get your husband in the kitchen and have him help cut it up. Ha! 🙂
image

3. See all those dark num nums at the bottom of the pot? Mmm, they’ll give us lots of flavor! Throw in your onions and add a little olive oil if you need to. Sauté about ten minutes and then add your garlic in, then sauté another few minutes.
image

4. Now add your frozen veggies and Rotel.
image

5. Season your veggies liberally with your favorite season-all.
image

6. Add your chopped up chicken back to the mix.
image

7. Add one box of chicken broth and bring to a boil.
image

8. Add your uncooked rice and allow to boil for a minute before turning to a simmer and putting a lid on it for 20 minutes.
image

9. Now add your queso to the soup. Oh my goodness, the cheesy goodness!!!
image

10. Now give your soup a healthy splash of half and half to balance it all out!
image

11. Your soup is done!
image

12. Serve with shredded cheese, avocado, sliced cherry tomatoes, green onion, and a dollop of sour cream! Mmmmmm!!!
image

Shrimp Etouffee

Standard
Shrimp Etouffee

Shrimp Etouffee

“Mama bought a rooster, she thought it was a duck. She put him in the oven with his legs straight up. Along came the children with a cup and the glass, tryin to get the gravy from the yas yas yas.” Whenever I think Cajun, I think of my neighbors Jay and Pokie Dean, and this is something I’ve heard them say at least 1,000 over the years. Don’t ask me what it means, because I have no idea, but I love listening to their Cajun rhymes and sayings. Their Boudreaux and Thibodeaux jokes are great, and I’ve never once left their house without a smile on my face and a full belly! This shrimp etouffee recipe was my attempt to satisfy my New Orleans craving, and I hope you’ll try it to in the spirit of Mardi Gras coming up!

Ingredients:
1 1/2 – 2 lbs raw shrimp with shells on
1 stick of butter OR 8 tablespoons bacon drippings (or you can use a combination of the two, but we’ll get back to that in a minute)
1 sweet onion chopped
1 large red, yellow, or orange bell pepper chopped or approx 8 mini sweet bell peppers chopped
2 cloves of garlic chopped
1 bunch of green onions chopped
8 tablespoons flour
1 1/4 tsp creole seasoning (I use Tony’s)
2 bay leaves (dried)
Pinch of cayenne pepper
3 cups chicken broth
1 T Worcestershire
Louisiana hot sauce to taste

1. Remove the shells from your shrimp and place shells and discarded onion skin and top into a stock pot. Add 3 cups of chicken broth and bring to a boil. Allow to boil for a few minutes, then bring to a simmer for about 10 minutes. Set aside.
IMG_0334

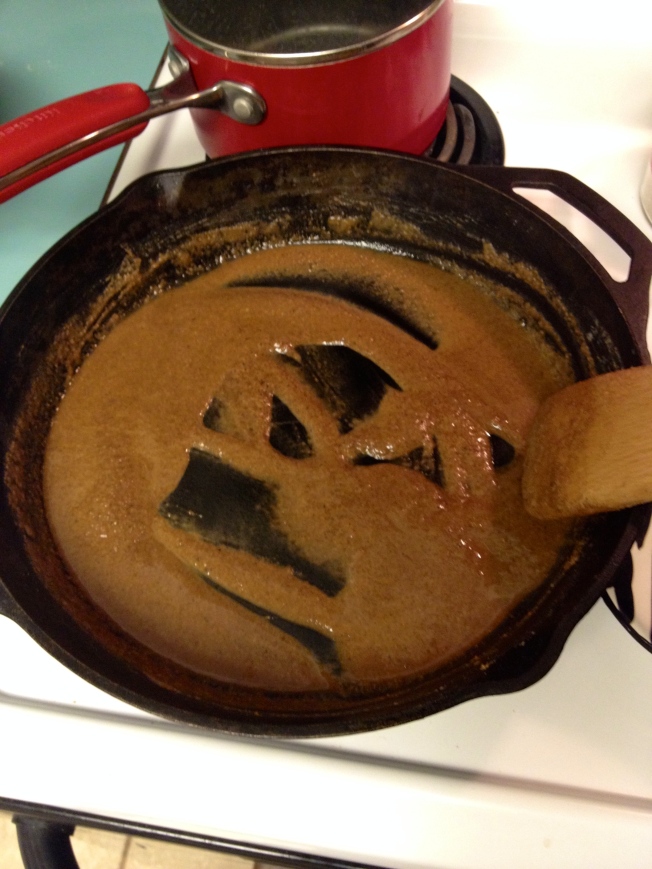
2. Next, we’re going to start the roux for the etouffee. I always use my trusty cast iron skillet for this. Have I told you how much I love cast iron? They last more than one person’s lifetime and in the unlikelihood that your house ever burned to the ground, you would still find your cast iron skillet in the ashes just waiting to be used. If you don’t have one, go out and buy one, I’ll wait………….. Ok, glad you’re back! Let’s get started on the roux! First, use either 1 stick of butter OR 8 tablespoons bacon drippings. Or feel free to use a combination of the two equaling 8 tablespoons. Add your flour to this as well and turn heat to medium.
IMG_0328

3. Now you’re going to stand there over the roux and not leave it for about 20-25 minutes. Yes, I’m serious. It needs to be stirred almost constantly and keep a watchful eye on it so it doesn’t burn! Allow me to take you through the process of cooking the roux:
IMG_0332IMG_0333
IMG_0336
IMG_0339
IMG_0340
IMG_0341
IMG_0342

4. Ok, now it’s done! Notice it sort of looks like you melted a giant Hershey’s chocolate bar in there. That’s how my mom always says you can tell the roux is done. Now, we’re going to mix in all those yummy veggies you chopped up!
IMG_0329

5. Stir them up and let them cook for about 10 minutes or until tender.
IMG_0346

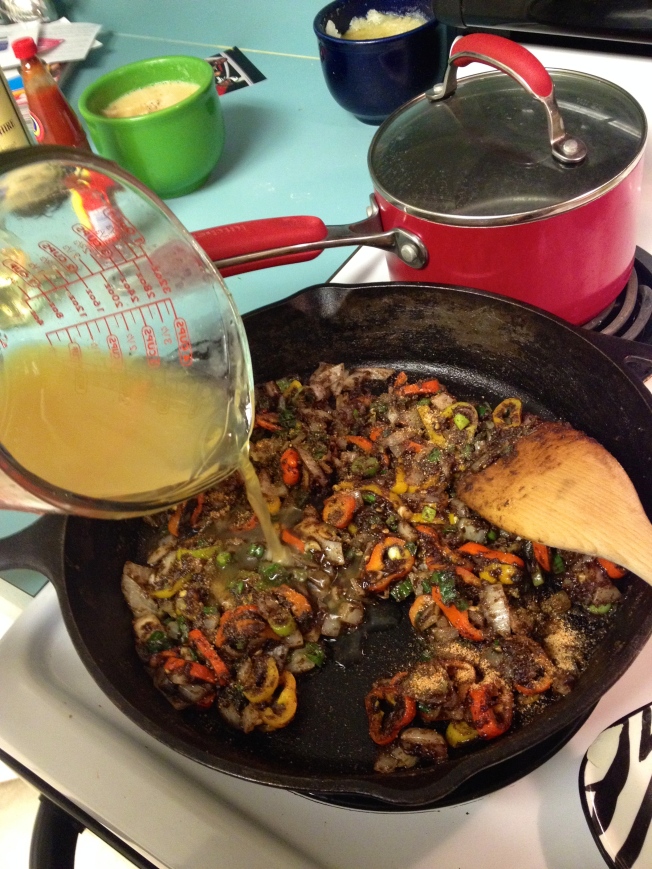
6. Remember that shrimp/chicken broth you made? Strain it and discard the yucky stuff in the trash can. Then pour the juice into the vegetable roux mix. Also add your Worcestershire, Louisiana hot sauce, and seasonings.
IMG_0347
IMG_0348

7. Bring to a simmer for at least 30-45 minutes or until it begins to thicken up.
IMG_0349

8. Now add your shrimp in and cook for another 10 minutes or so.
IMG_0351

9. It will look like this when it’s done:
IMG_0352

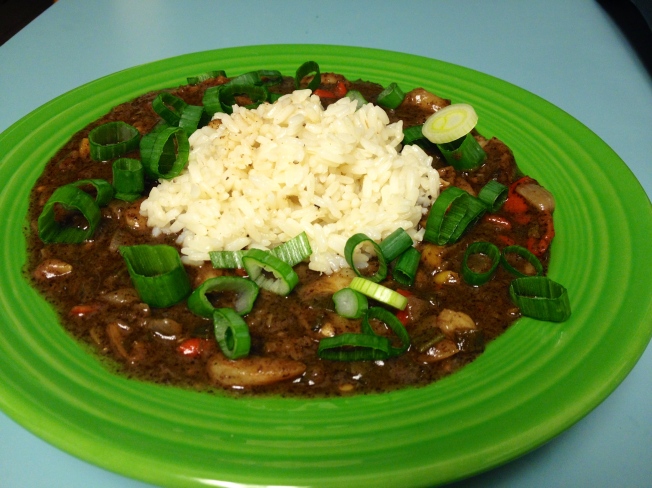
10. Congratulations! You’ve crossed the Louisiana border and made etouffee! It was a lot of steps, but 100% worth it once you taste this delicious dish! Don’t forget to remove your bay leaves before eating! Serve with rice and more green onion for garnish 🙂
IMG_0357

Chicken Parmesan

Standard
Chicken Parmesan

Chicken Parmesan

I’m sure most of you are used to your traditional breaded and fried Chicken Parmesan, but this is a baked version. Read: I did not say this was recipe is better for you, but we can pretend I did if that makes you feel better 🙂 As I was saying, this recipe is less mess and so much tastier than the traditional version! So crack open a red and let’s get started!

Ingredients:
1 package boneless skinless chicken thighs
1 cup REAL mayo
1/2 cup Italian breadcrumbs divided
1/2 cup shredded Parmesan cheese (Notice I said shredded, not that imitation grated stuff on the shelf)
1 cup shredded mozzarella cheese
Salt and pepper

1. In a mixing boil combine mayo, 1/4 c Italian breadcrumbs, and Parmesan cheese.
image

2. Place your chicken on a cookie sheet that’s been lined with foil and sprayed with nonstick spray. Season with salt and pepper. Then spread your mayo mixture evenly over the chicken.
image

3. Sprinkle remaining Italian breadcrumbs over the chicken.
image

4. Place chicken in a 375F oven for 40 minutes.
image

5. Pull chicken out after about 40 minutes and sprinkle mozzarella all over the chicken. Put back in the oven for another 5 minutes.
image

Serve with whole wheat angel hair pasta, marinara sauce, and cheesy garlic bread for a delicious dinner!

Cream Cheese Chicken Enchiladas

Standard
Cream Cheese Chicken Enchiladas

Chicken Enchiladas With Cream Cheese Sauce

So, once again I had leftover grilled chicken and needed to do something with it, plus I had a request for a chicken enchilada recipe, so naturally I made my delicious cream cheese chicken enchiladas. Back in college, my friend Jill used to make her chicken enchiladas very similar to this recipe, and I’ve taken it and done things a little different with it. Actually, many things are different from when I was back in college, like how much I can drink and how late I can stay up, but that’s neither here nor there. I love the cream cheese sauce instead of a sour cream sauce and think these are so yummy! Also, I’ll go ahead and say I ran out of shredded cheese (in our family we call this “sprinkle cheese”) at the end, so I didn’t have nearly as much cheese on top of the enchiladas as I would’ve liked. It was a Great American Tragedy lemme tell ya, but they were still tasty 🙂

Ingredients:
2-3 cups of chicken chopped, sliced, shredded, whatever (Don’t make this part hard on you – use leftover chicken, a store bought rotisserie chicken you picked apart with your hands, or pan sear some chicken and chop it up in your kitchen)
1 1/2 cups salsa (Yes, you can use store bought salsa if you’d like. However, I’d suggest adding some chopped cilantro to it since they never have that fresh taste to them)
2 8 oz packages cream cheese
1 can Rotel
2 cans diced green chiles (I like the Hatch brand hot ones, but mild is fine too)
1/4 tsp garlic salt
Pepper to taste
1 dozen tortillas
At least 1 cup shredded cheese

1. Place your cream cheese in a pot over the stove on low heat. Don’t rush this because it burns easily. Keep stirring it around until it’s smooth and creamy like this.
-12

2. After it’s melted and creamy, add your salsa, Rotel, chiles, garlic salt, and pepper to cream cheese and stir. Taste the now pinkish mixture to see if you want to add more salsa to it or if you like it how it is. Keep on low to medium heat.
-13

3. Take one cup of the cheese sauce and pour over your chopped/sliced/shredded chicken. It will now sort of look like the most delicious chicken salad you’ve ever seen in your life! -14
-1

4. Spray a 9×11 baking dish with non-stick spray and preheat your oven to 350. Start to fill up your tortillas with about two spoonfulls each of chicken mixture.
-2

5. As you’ve heard me say before, I like corn tortillas and my husband likes flour, so I had him come in and help hold down the corn ones because they’re a little tricky sometimes.
-3

6. Pour the cheese sauce all over the enchiladas and make sure to spread it out so it covers the entire baking dish and there aren’t any “naked” tortillas.
-4-5

7. Sprinkle as much shredded cheese as you like all over the enchiladas.
-6

8. Bake in a 350F oven for 20-30 minutes or until cheese is melted and sauce is bubbly 🙂-7

Chicken Quesadillas

Standard
Chicken Quesadillas

Chicken Quesadillas

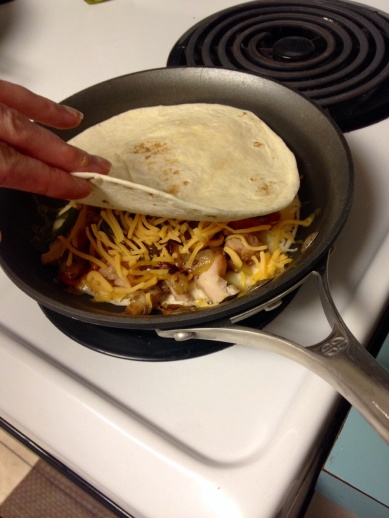
Take a look at this little beauty! That is the delicious inside of my chicken quesadillas before I put the top on. I usually use whatever meat I have leftover in my fridge (steak, chicken, pulled pork, etc), and in this case I used leftover grilled chicken.

Ingredients:
1 sweet onion chopped or sliced, whatever you prefer
Several sweet peppers sliced into rings or 1 bell pepper sliced
1 jalapeño sliced into rings
1 garlic clove chopped
2 T butter
Olive oil
Salt and pepper
Chopped meat of your choice (about 1/2 cup per quesadilla)
Mixed shredded cheese
Tortillas

1. Put your peppers, onions, salt, pepper, drizzle of olive oil, and butter in a skillet. Sauté about 15 minutes on medium to high heat, then add garlic and sauté another five minutes. Peppers and onions

2. In a different skillet you can either drizzle a little olive oil in it or rub with a little butter to get it ready for the tortilla. Place tortilla in, sprinkle with one layer of cheese, and put as much meat and veggies as you want on there.
Chicken Quesadillas

3. Put another layer of cheese on top of the meat and veggies and put another tortilla on top. *Note* I used flour for my husband and corn tortillas for me. I let them cook a little longer in a little extra butter and got it nice and crispy. Let me tell ya, it was delicious!
image

4. Flip that bad boy over and allow both sides to become deliciously golden. That was so easy, I bet you didn’t even have to set your wine glass down!
image

Roasted Vegetables

Standard
Roasted Vegetables

Roasted Vegetables

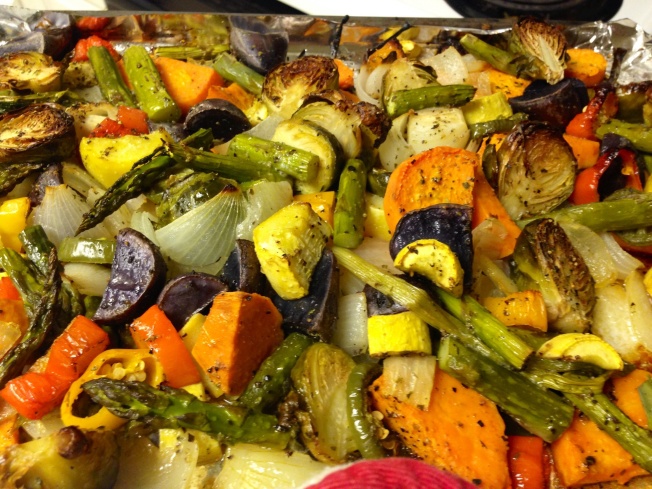
These roasted veggies are super delicious and very good for you. I’ve done virtually every veggie combo in this recipe, but these were what I had in my fridge: yellow squash, zucchini, asparagus, sweet potato, purple potato, sweet onion, Brussels Sprouts, jalapeño, sweet peppers, and green onion. Other veggies I love in here are cauliflower, broccolini, cherry tomatoes, carrots, whole garlic cloves, and bell peppers. The next day I love to chop any leftovers up and add to seasoned quinoa and add a can of drained black beans for dinner.

Ingredients:
Sliced vegetables
Olive oil
Seasoning
1-2 T of butter (optional)

1. Cut up all your veggies and arrange on a sheet pan lined with foil (helps with cleanup later).
Cut Veggies

2. Drizzle olive oil all over veggies on the pan and add your little pats of butter if you’re using it. Then season liberally with salt and pepper. I also love to use Tone’s Garlic Herb (salt free) seasoning on my veggies, but you can use virtually any seasoning you like, just make sure there isn’t any salt in it, and if there is omit adding additional salt.
Seasoning

3. Place veggies in the oven at 425F for one hour. Be sure to stir veggies around about halfway through to ensure even cooking.
image

4. Veggies will be soft and roasted perfectly at an hour, but you can leave in a little longer if you like them browner. image

Mexican Rice

Standard
Mexican Rice

Mexican Rice

Wow! I feel like it’s been 100 years since I’ve posted anything here! I had a wonderful holiday break with my family, and am now sitting here with the men of the family trapped by endless football. The BCS Championship is apparently an important game 😉 Anyway, an endless football evening routine isn’t complete without delicious food, and this Mexican rice went fantastic with our Mexican themed dinner!

Ingredients:
1/2 sweet onion diced
1/2 stick of butter
Drizzle of olive oil
1 T cumin seeds
1/2 cup homemade salsa
1 1/2 c rice (I use Uncle Ben’s Converted Rice)
2 3/4 c water
1 garlic clove diced
1 tsp tomato bouillon (note: if you can only find in the cubes just chop up finely a little less than 1 cube)
Salt and pepper

1. Toss onion, butter, olive oil, salt, and pepper in sauté pan on medium high heat. Sauté for five minutes. image

2. Add cumin seeds, garlic, and rice to pan. Sauté another 5-7 minutes and watch carefully as to not burn the rice or garlic. Add more olive oil if needed. image

3. Add tomato bouillon, salsa & water, then bring to a boil for one minute. Then place lid on, turn heat to low/simmer, and cover for 20 minutes.
image
image
image

4. Voila! Mexican rice 🙂
image