Category Archives: Pork

Smoked Stuffed Cabbage

Standard
Smoked Stuffed Cabbage

  
Y’all remember from my last post about smoking meatloaf and how delicious it was. Well this time we decided to smoke some stuffed cabbage, which again was inspired by seeing it on a restaurant menu at a BBQ place. It was so good and I hope you’ll give it a try the next time you’re considering sides for your next BBQ.

Ingredients:

  • 1 large head of cabbage
  • 1 lb bacon
  • 1 sweet onion
  • 1 jalapeño chopped (with seeds if you like it hot)
  • 2 T butter divided 
  • Olive oil
  • 1 garlic clove chopped
  • Salt and pepper

1. First prep your cabbage head by peeling off and discarding the outer leaves. Then core it by using a sharp knife to dig out the core and scoop out enough room to stuff it.


2. Slice your bacon into bite size pieces and cook in your skillet. Then take out the cooked bacon and place onto a plate with a paper towel to allow it to drain and remove all but a couple spoonfuls of the bacon grease from the skillet.


3. Now add your chopped sweet onion, jalapeño, salt, pepper, and 1 T of butter and sauté for about 15 minutes allowing the onion to caramelize. Then add your garlic in and cook another 5 minutes or so.


4. Turn the heat off and add your bacon back to the mix. 


5. Drizzle the inside of your cabbage head with olive oil, season with salt and pepper, and add your other T of butter. Then begin to fill with your stuffing.


 6. Now wrap it all up in foil and put it on your smoker at 225F about 3 hours. Your cooking time might vary depending on how hot your fire is and the size of your cabbage, but you’ll know it’s done when the cabbage turns very soft.  

  
7. Once it’s cooked bust that puppy open like a bloomin’ onion and chow down!


Smoked Meatloaf

Standard
Smoked Meatloaf

  
Yes, you heard me correctly… Smoked meatloaf is where it’s at my friends! I will never again make meatloaf in the oven after eating this! Wow! It was juicy and delicious with the most awesome smoke flavor. Seriously yall, you’ve got to try this!

It’s my husband’s birthday this week and I know he’s always wanted a smoker. So I got him one and of course we couldn’t wait to try it out. Aside from the obvious things people smoke, I wanted to try a slightly adjusted meatloaf version of my regular meatloaf recipe. I had heard about a restaurant that serves it as well as traditional smoked BBQ, and I’m so glad it worked out for us too!

The key is to cook your meat at about 225 degrees (low and slow). I had originally thought it would take about 4 hours to cook my two pound meatloaf, but it ended up being done right at 2 1/2 hours. My original plan was to glaze it halfway through, but when my husband went to glaze it, the internal temperature was at 165, so it was time to come off. I ended up glazing it and running it under the broiler for a few minutes in my oven, which worked out just fine. Either way you want to glaze this will work.

Ingredients:

  • 2 pounds ground meat
  • 1 sweet onion chopped
  • 1 large bell pepper chopped
  • 1 garlic clove chopped
  • 1 beaten egg
  • 1 c Italian breadcrumbs
  • 1 T butter
  • Olive oil
  • Salt and pepper
  • Ketchup, mayo, and BBQ sauce
  • Optional but highly recommend  Weber 17103 Mesquite Wood Chips, 3-Pound

1. First get your firewood going in your smoker with your favorite wood. My dad loves to use Post Oak to smoke all his stuff with, but we don’t have any of that in Amarillo. I buy the cheapest firewood possible and flavor it with a few of those mesquite wood chips I was telling you about.


2. Let’s get your veggies going for the meatloaf mix. I know I said 1 large bell pepper earlier, but I have baby bell peppers growing in my garden so I grabbed enough that I thought would equal one large one.


3. Season veggies liberally with salt and pepper and drizzle with olive oil. After about 15 minutes of cooking them over medium heat, toss in your chopped garlic and cook another five minutes or so. Also, it was at this stage my veggies were crying out for butter, so I happily obliged and added about a tablespoon or so. Because, why not?


4. In a large mixing bowl have your ground meat ready to go seasoned liberally with salt and pepper.Then add your cooked veggies.

  
5. Now add a healthy squirt of ketchup and BBQ sauce, and a heaping spoonful of mayo. We are serious about BBQ sauce in our house. Also, if you live in the South you probably already know about Duke’s mayo. But if you don’t, I highly suggest you acquaint yourself. Yum!


6. Now add your beaten egg and breadcrumbs to the bowl and mix it up with your hands so they’re all one big happy family!


7. Now get out your foil and place the meatloaf on the dull side to prevent sticking. This was my first time using Kingsford Hd Non-Stick Foil, 45 sq. ft. and I loved it! Absolutely no sticking whatsoever! 


8. If your smoker temp is around 220, wrap your meatloaf up and get to smokin’! Also, crack open a beverage because it’s beer thirty!


9. Like I said earlier, my meatloaf was done at 2 1/2 hours, so I didn’t glaze it here. Be sure you have an instant read thermometer so you can get the temperature right on the meatloaf. The USDA recommends a temp of 160, but also keep in mind it will continue to cook once you pull it off, so you don’t want to let it go much higher than that. Weber 6492 Original Instant-Read Thermometer <— Click here if you don’t have one and need one.


See how the temperature keeps rising even after its off the heat?

10. For the glaze, I do 60% ketchup and 40% BBQ sauce. Don’t get out your measuring cups, just eyeball it and adjust it to how you like it. You can change it up by adding worchestishire or brown sugar or anything else you like. But I’m just a simple gal that loves a simple glaze. 😜 

  
 11. Dump and smear it all over your meatloaf and then place it under your broiler for a few minutes.

  
12. Now it’s done! Wow! Have you ever smelled anything so delicious? It’s like someone sprinkled crack on mom’s meatloaf. So good 😀


Winning Mexican Breakfast Casserole

Standard
Winning Mexican Breakfast Casserole


This is my winning recipe for breakfast casserole from a contest through the United Supermarket grocery stores. 😊

This is my go-to breakfast casserole for when I’m feeding a small crowd or have company coming over. It’s perfect to make the day before and let it sit in the fridge until the morning of when you pop it in the oven. I’ve made it with chorizo before instead of bacon and that’s pretty good too. But what can I say? Bacon has my heart! 🐷😍

Ingredients:

  • 8 corn tortillas (highly recommend corn, but if you can only find flour that’s ok too)
  • 8 eggs
  • 1 T butter
  • 2 cups half and half  (or you can make your own half and half with 1 c milk and 1 c heavy cream) 
  • 2 cups of your favorite grated cheese (you can mix and match any cheese here)
  • 8 sweet baby bell peppers chopped or if you can’t find those 2 regular bell peppers any color chopped
  • 1 small sweet onion chopped
  • 1 chopped jalapeño (optional but adds a nice heat)
  • 1.5 pounds of bacon cooked crispy and crumbled 
  • Salt and pepper
  • Pico de Gallo for topping 

1. In a 9×13 baking dish that’s either been sprayed with non-stick cooking spray or buttered line your corn tortillas on the bottom.

 
2. In a large skillet dump your bacon and cook until crispy. Drain off most of the fat and reserve about a tablespoon in the skillet for the next round of cooking. Set bacon aside on paper towels to drain and cool.


3. Dump your chopped onion and peppers into your skillet and add 1 T butter and season with salt and pepper. Sauté on medium high heat for about 15 minutes or until all soft and starting to caramelize. 


3. Now that your bacon has cooled, crumble the bacon all over your tortillas. It would probably look nicer if I cut the bacon all uniform with a knife, but if I use my hands it’ll give me an excuse to eat the little pieces stuck to my hands later. No regrets.

  
4. Now sprinkle your cooked vegetables all over your bacon.

 
5. Whisk together 8 eggs and your cream and milk and season liberally with salt and pepper.


6. Pour egg mixture over your bacon and veggies.


7. Take two cups of your favorite grated cheeses and sprinkle on top. 


8. This is where I cover with plastic wrap and put in the fridge overnight until I need it in the morning. Once ready to cook, place in a 350 degree oven for 45 minutes or until egg is cooked through and the sides start to turn golden.


9. After it’s cooled down a bit out of the oven, top with Pico de Gallo and pour yourself a delicious mimosa! 

  B

Easy Glazed Ham

Standard
Easy Glazed Ham

/home/wpcom/public_html/wp-content/blogs.dir/991/58902680/files/2015/01/img_0999.jpg
Glazed ham has got to be one of my favorite things to eat and cook. It’s so easy and that delicious ham can feed your family for a week!

I remember years ago when I first tried to bake a ham for my first Easter away from home. If you’ll google ham recipes, you’ll find lots with cloves that you stick into the ham, then later remove. It’s pretty tasty, but cloves are expensive, plus time consuming to put in and remove before eating. I’ve tried all these complicated and expensive (to me) recipes, but I’ve finally settled on my favorite glazed ham recipe and it only requires three ingredients! I even have a solution to cloves and it keeps your ham moist, plus it adds some awesome flavor to your juice that you save and make a pot of peas, green beans, or anything else with. I’ll give you a bonus recipe as well with what I did with this leftover ham 🙂

Ingredients:
1 c apple cider
1/2 c brown sugar
1/4 c honey
Ham (I mean, obviously…)

Ok, first lets talk about the ham. Sure, everyone loves the spiral cut runway model of hams. But who has $50 to blow on a ham? Especially when you can spend $10-$15 on the same amount of meat and you just cut it yourself. Do yourself a favor if you’re penny pinching like me and buy the cheapest ham at your grocery store, which will most likely be the shank end of a ham. Remember you’re glazing it yourself, so no need for any extras like pre-packaged full of preservatives and other stuff glaze. Just a cheap ham shank. Also, this glaze is going to work for any ham up to about 12 pounds, so if your ham is bigger, just make a little more glaze.

1. Take a paring knife and cut all around your ham in one direction about 1/4 inch into the ham, then around it again in the opposite direction making little diamonds all over your ham. Now it sorta resembles a checkerboard. This will let the skin crisp up and allow the glaze to flavor the inside of the ham once we get there. Place your ham in a large roasting pan. Do not underestimate the amount of juice your ham will make and put it into a roasting dish that’s too small. You’ll end up cleaning up your oven forever! Ask me how I know this 😳

/home/wpcom/public_html/wp-content/blogs.dir/991/58902680/files/2015/01/img_0992.jpg

2. Pour one cup of apple cider in with your ham. Any apple cider will do. They’re spiced and seasoned with yummy flavors like clove, cinnamon, and who knows what else. I just know it’s delicious and really gives the ham a yummy flavor, plus it keeps it moist. Then cover in foil and place in your oven 15-20 minutes PER POUND at 325. So, if your ham is 10 pounds, that’s 150-200 minutes baking time. The last 30 minutes of your baking time we will glaze the ham, so set a timer for yourself. Also, you pick the cooking time based on how your tastes are, so my suggestion is set a timer for the shorter time, look at it, and if you want to cook it longer (like I did), then cook it longer.

/home/wpcom/public_html/wp-content/blogs.dir/991/58902680/files/2015/01/img_0993.jpg

3. The last 30 minutes of your baking time remove the foil from your ham and pour the glaze all over it. To make the glaze, just put your brown sugar and honey in a microwave safe bowl and nuke it about 1 minute, stirring halfway through. If you don’t have a microwave, you can do it on your stovetop. After you’ve poured the glaze on, put back in your oven for another 30 minutes.

/home/wpcom/public_html/wp-content/blogs.dir/991/58902680/files/2015/01/img_0996.jpg

4. After 30 minutes your ham is done! Take it out and let it rest about 10-15 minutes before slicing into it.

/home/wpcom/public_html/wp-content/blogs.dir/991/58902680/files/2015/01/img_0998.jpg

Things to do with leftover ham:

1. Similar to the Hawaiian Sweet Roll ham sandwich recipe I’m sure you’ve all tasted at parties, here is my spin on that: Using 24 dinner rolls from your store’s bakery, cut in half and place on a sheet pan. Cover bottom roll with 50/50 miracle whip/mayo and top with leftover ham and Swiss cheese. Place top back on rolls. In a microwave safe dish, mix 1 cup baked ham juice from roasting pan and 1 stick melted butter. Pour over the rolls and allow to sit anywhere from 10 minutes to overnight in the fridge wrapped in foil. Place covered in foil in a 350 degree oven for 15 minutes, then serve the most delicious little ham sandwich straight from heaven.

2. Save the leftover ham juice and ham hock. You can use them separately in different dishes to stretch out the use of your ham. Check out my turnip greens recipe if you like those. Or put the ham hock in a pot of beans, cream peas, soup, etc. You can’t go wrong! I even used part of my leftover juice to boil a bag of frozen green beans with salt and pepper and they were fantastic!

Hambone, hambone, have ya heard?! I’m sorry, I couldn’t resist 😄

Pulled Pork Enchiladas

Standard
Pulled Pork Enchiladas

Pulled Pork Enchiladas

Y’all know I love to buy meat in bulk and cook my fabulous meals on the cheap, but coming up with different recipes with the same meat can be tricky! Making 2-3 different meals with the same meat can help break up your dinners so it feels like you did the whole thing that night brand new. This recipe uses leftover pulled pork, and there are so many different things you can do with pulled pork besides BBQ sandwiches. This and my pork tacos are probably my two favorite Mexican themed dishes to do with leftover pulled pork. Also, there aren’t really measurements for this because each person will obviously have different amounts of leftovers, so I tried to take good pictures of the portions I used so you can get an idea for when you do yours.

Ingredients:
Leftover pulled pork
Tortillas (corn or flour. – both are great, but I used flour here only because that’s what my husband likes)
Caramelized onions
Green chiles
Sour cream
Mixed shredded cheese
Enchilada sauce
Salt and pepper

1. First put all your pulled pork in a mixing bowl. Pure guesstimate here, but I’ll say this looks to be about 4 cups of pulled pork.
image

2. Take a few handfuls of your favorite shredded cheese, a few spoonfuls of sour cream, caramelized onions, green chiles, and a little salt and pepper and put it in your mixing bowl.
image

3. Give it a big stir and it should look something like this:
image

4. Get your enchilada sauce and smear a few spoonfuls at the bottom of a baking dish.
image
image

5. Start stuffing your enchiladas by putting a few spoonfuls of the mixture in the tortillas. It helps if you warm them up a little first by wrapping them in a damp paper towel in the microwave for a little bit to prevent them from cracking.
image

6. Once your dish is full of enchiladas, pour your sauce on top and top with shredded cheese.image

7. Cook in a 350 oven for about 40 minutes or until cheese is melted and sauce is bubbly.
image

This is a side note, but if you’re one of those people that packs lunches for your husband or likes to have individual freezer homemade meals, I like to do a few individual enchiladas here to be placed in the freezer. Assemble, cover with plastic wrap, then a layer of foil and freeze. To cook later, remove foil/plastic wrap and place in oven/microwave for a tasty individual meal.
image

Pork Chop Grenades

Standard
Pork Chop Grenades

Pork Chop Grenades

This is one of those summer hits that people will be wanting your recipe for. A few years ago, I saw a recipe on one of those recipe chain Facebook posts for stuffed chicken breasts that used these same stuffing ingredients, and thus, eventually the pork chop grenade was born. At first, I made this recipe using chicken thighs, but it has expanded to the “other white meat”, and I’ve gotta say it’s pork perfection! But feel free to sub chicken or even pork tenderloin in place of a pork chop here – it really is versatile!

Ingredients:
Pork chops or pork steaks with bones removed
BBQ sauce (I used Sweet Baby Rays here)
1-2 strips of bacon per grenade
1/2 jalapeño sliced per grenade
Your favorite grilling seasoning or just plain salt and pepper
About 1 T cream cheese per grenade

1. This recipe graduated from chicken to pork because these bone-in pork steaks were on sale for a steal at the store. See what being a savvy shopper can do for you? 🙂 I just cut out the bones of the steaks before using them. Obviously, the easiest thing would be to buy thin cut boneless pork chops.
image

2. Sprinkle your favorite grilling seasoning on your meat and put about a tablespoon of cream cheese on each chop.
image

3. Using either the back of a spoon or your fingers, mush the cream cheese out a little bit and place 1/2 a jalapeño on each. I like to keep a few seeds and stems in mine to keep them spicy! Please excuse the blurry pic 🙂
image

4. Now here is the messy part! You’re going to wrap these up into grenades using 1-2 slices of bacon each. Try to seal them up with the bacon because it helps keep the stuffing inside. I like to do a little fresh cracked black pepper on top of the bacon because it’s delicious and it looks pretty.
image

5. Now you can decide to either bake or grill these. Normally, I grill mine but now that I’m living in Amarillo AKA the US’s windiest city , I don’t particularly enjoy grilling in gale force winds, so I bake them. I use a grilling sheet I’ve sprayed with non-stick spray on top of a cookie sheet/jelly roll pan lined with foil for easy cleanup. Bake at 375 for anywhere from 45-60 minutes based on the thickness of your meat. Then take them out and turn the heat up to 400 or crank the grill up.
image

6. Now you’re going to baste them with your favorite BBQ sauce and put back in for 10-15 minutes. Again, you don’t want to overcook them, so keep in mind the thickness of your meat before you cook it.
image

7. Your grenades are ready to eat! Let’s cut into one of these babies and check out that creamy spicy perfection!
image
image

Breakfast Hash

Standard
Breakfast Hash

-8

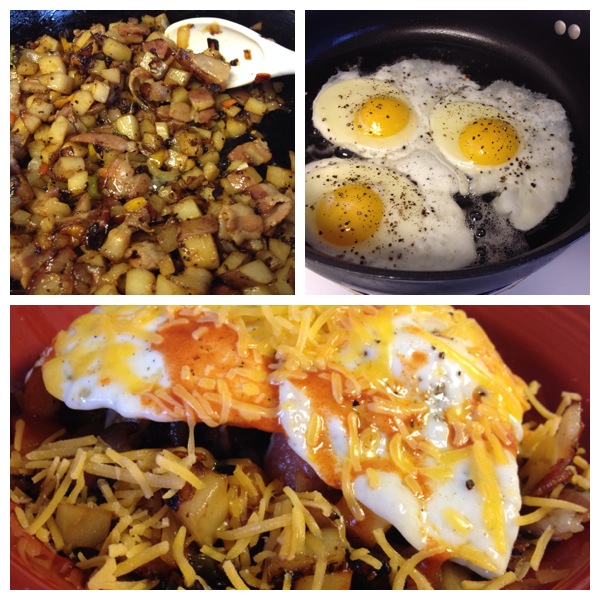
What else can I say about this breakfast that doesn’t tell you it for itself after seeing this picture? It’s delicious and has no calories whatsoever! Ok, so that’s a lie, but come on, who cares once you taste this delicious concoction!

Ingredients:
3 medium red potatoes chopped
1 sweet onion chopped
A few sweet peppers chopped (optional – you can leave out or use a bell pepper if you don’t have sweet peppers)
6-8 slices of bacon chopped (I just used what I had leftover in my package of bacon. Feel free to use an entire package for this!)
1 jalapeno chopped (if you don’t like the heat, remove the stems and seeds, or just use half)
1 garlic clove chopped
2 T butter
Olive oil
Salt and pepper
1-2 fried eggs per person (this made enough for 2 of us to have large servings)
Shredded cheese and Louisiana hot sauce for garnish

1. Saute onion and peppers in butter and olive oil for about 15 minutes on medium to high heat.
-9

2. Add bacon and chopped potatoes, and saute another 5 minutes before adding chopped garlic. Season with salt and pepper.
-10

3. Fry up your eggs in a separate skillet (1-2 per person). As a good southern girl, I keep a bowl of bacon grease on hand by my stove top for occasions such as this where I need to fry an egg in bacon grease. Don’t you dare try to tell me an egg “fried” in a skillet with Pam is fried. That’s blasphemous and may God have mercy on your soul! However, should you like your eggs sunny side up, you can add them later and cook on your skillet under the broiler later if you’d like.
-11

4. Put several healthy spoonfuls of your delicious hash into a bowl and top with your friend egg. Then garnish with cheese, Louisiana hot sauce, or whatever else you like. -6
-7

Southern Turnip Greens

Standard
Southern Turnip Greens

Turnip Greens

I think Billy Currington said it best with his lyrics “Thank God for good directions and turnip greens.” I love greens and especially turnip greens! This recipe is great for just them, or you can mix and combine any greens together as well. The trifecta for me is collard, mustard, and turnip greens together, but this time I stuck with the classic original turnip greens. I love to serve these aside grilled chicken and sometimes I’ll even eat a big bowl of them for breakfast. I also like to shake a little pepper sauce on them to wake them up a little bit! Here’s what you’ll need…

Ingredients:
1 big bunch of greens roughly chopped (you can get these already chopped in a bag in the salad isle if you don’t feel like doing them yourself)
1 sweet onion chopped
2-3 cloves of chopped garlic
6-8 slices of bacon chopped into 1-2 inch pieces
1/8 tsp (pinch) of cayenne pepper
1 chicken bouillon cube (I only use Knorr brand)
1/2 tsp garlic salt
Pepper
Olive oil
3 cups of water

1. In a pot saute onion with a little olive oil for about 15 minutes on medium to high heat. You want them to start caramelizing before you add anything else in. Once this happens, put your bacon in and cook for about 5 minutes before adding your chopped garlic in. Continue to cook for another 7-10 minutes or so until the bacon is mostly cooked. (I know traditionally in the South people use a ham hock here, but I really do prefer the bacon flavor over the ham hock. Scandalous, I know!)

2. You’ll probably have to do this in batches, but start adding in handfuls at a time chopped greens. You’ll need to saute each batch for a few minutes to make room for the rest to make it into your pot. Once you’ve done this 2-3 times, you should be about finished with wilting down your greens. Now you can add your seasonings.

3. You’ll want to add your water to the greens just so that they’re slightly covered. For me, this was about 3 cups. Then you’ll let the greens simmer with the lid on for a while until they are tender and delicious.

*Note* Some people like to add the actual turnips into the greens and serve them with them as well. If you want to do this, get out your best peeler and a glass of wine, because this will take a little time to get the turnips peeled. Chop them up into bite size pieces and add to the greens when you’re adding the water. You’ll need to let them simmer for at least 30 minutes for them to cook, and you might consider adding additional seasoning. Taste it first though before you add anything to make sure. Enjoy 🙂

Pulled Pork Tacos

Standard
Pulled Pork Tacos

vm02avfa29vpfnuob54h4k9ixljdykqj

I love shopping on Mondays at our local grocery store, because that’s when they put all of their meat on sale they’re trying to get rid of before their new shipment comes in. I have an extra freezer at my house for this very thing because the deals they offer are just too good to pass up. Earlier this week one of my purchases was pork shoulder blade roast for $7. My family of three has been eating pulled pork every day for a week and I still have some leftover! Needless to say, I had to get creative with how I prepared it every night so we didn’t get tired of eating the same thing. So after preparing pulled pork sandwiches, pulled pork enchiladas, and pulled pork breakfast sandwiches, I decided to make tacos with it one night. It has definitely been our favorite way to eat it! Pulled pork tacos aren’t anything new, but here is my recipe for them:

Ingredients
1.5 – 2 pounds pulled pork
1 can black beans drained
1/2 sweet onion chopped
2-3 tablespoons of your favorite BBQ sauce (I use Sweet Baby Ray’s Original)
1 garlic clove
Salt and Pepper
Handful of chopped cilantro
Tortillas (I use white corn, my husband uses flour)
Olive Oil
2 roasted green chiles or 1 small can diced green chiles (optional)

1. In a saute pan or cast iron skilled heat chopped onion over medium to high heat with a drizzle of olive oil and cook until it begins to caramelize. Season with salt and pepper and add garlic cloves. Saute for a few more minutes at medium to high heat.

2. Add pulled pork, drained black beans, chiles (if you’re using them), BBQ sauce, and cilantro. Turn heat down to low and stir until it is entirely heated through and ready to eat.

3. In a separate skillet on high heat drizzle olive oil in there and heat tortillas on both sides. Stuff with pulled pork filling and top with your favorite taco toppings. My favorite is to top with my homemade salsa.

Favorite Beans

Standard
Favorite Beans

Favorite Beans


Ever since my sister and I were little we always asked for these beans as “favorite beans” because as you have probably already figured out, they are our favorite beans. It’s a great side dish to grilled chicken, grilled pork, burgers, or BBQ and is an easy, cheap way to feed a family or small crowd. The best thing about these beans is you can change up the bean ingredients each time and they are still delicious!

Ingredients:
3 different cans of beans (featured here are Bush’s Grillin Beans “Smoke House Tradition” 22 oz can, Bush’s Best Black Beans 15 oz can, and Bush’s Best Pinto Beans 15 oz can) **I will say I always use a can of Grillin Beans and switch up the other two ingredients because I consider these a staple to this recipe**
1 sweet onion
1 jalapeno
2-3 cloves of garlic chopped
3-4 slices of your favorite bacon
1-2 tablespoons of your favorite BBQ sauce (optional)
Salt and Pepper
Olive Oil

1. I like to use my cast iron skillet for this side dish. If you don’t have one you need to get one because every cook should have a cast iron skillet, but if you must use a regular skillet that’s ok for now 🙂

2. Dice up your sweet onion and slice your jalapeno into rings. Place in saute skillet over medium to high heat with a drizzle of olive oil and season with salt and pepper. Saute for 10-12 minutes or until it starts to caramelize and parts of onion appear golden. (Don’t rush caramelizing the onion because you’ll just burn it. This takes time. Sit down, relax, have a glass of wine. Are you a mom? Leave the stove top for a minute and go see what room of the house your child has destroyed. Hint: all of them)

3. Slice bacon into bite size pieces and throw bacon in at this time. Cook for about 5-7 minutes minutes before throwing in your chopped garlic. Cook another 5 minutes or so. Be careful not to burn the garlic and add olive oil as needed throughout saute process to keep moist.

4. Once bacon has been cooked and onion is fully caramelized, add three cans of beans to the mixture (do not drain beforehand). Turn heat down to low and allow beans to mingle with the yummy onion/jalapeno concoction for a few minutes while stirring to help them along. Give it a taste and see what you think. If you like your beans a little sweeter give them a healthy squirt of your favorite BBQ sauce. Personally, I like to add a squirt of Sweet Baby Ray’s Original BBQ sauce in there to take this dish over the top.